cake journal has a good tutorial
I used a foam ball
gum glue
22 gauge wire
scissors
rolling pin
ball tool foam pad thin and thick
mat
crisco
I only had two cutters
stretching them with the ball tool made them larger


 we wrapped wire around a foam ball and used gum glue to attach the petals overlapping
 Use the ball tool to gently thin the petals
 then move to a foam pad to cup the petals making them curl up.
 The first layer took 9 petals
One tutorial used foil that was formed in half a foam ball to let the petals dry in. I must try that.

we saw a utube tutorial that said the fourth row of petals should be on wire.
Little birdie secrets has a tutorial.
I noticed some people use a viener I need t try this next time
this is nice egg former it says it was a chocolate mold
Another peony design is here
http://pinterest.com/pin/64598575877387847/
 this is great blog in German
n addition to the cutters or templates you need a 3 cm wide, by dried flowers paste ball (or a styrofoam ball) on wire, a ball tool , a cutting wheel , possibly a craft knife, a nail clipper, a Flowerpad, a grooved board (Celboard) and a Ausrollstab sugar glueand something Palmin, of course flowers paste and possibly paste color . In addition, a board, is available in the supermarkets fruit, very helpful. Not visible on the image are teaspoons and tablespoons and the 28 floral wire (coated paper).
I have each petal with a Veiner (peen) structured so that does not necessarily have to be

Thin out the top immediately with the ball tool. His removal in 2 places inside of the petal with the ball tool with light pressure from the top to about the middle. Here, the petal shaped inwards and is slightly rounded.
Inner molding works best when the petal dries very briefly. That you have to maybe try a few times - it does not always work right away right away. I've also had some failures, because the flowers paste still wet was ... But you may not have to wait too long, otherwise the paste to dry and there are cracks!
The operations: thinning at the top, embossing and internal mold release are repeated in all subsequent petals I mention this not as a rule below ...

 The 3 petals with sugar glue on the ball and attach the same with the second stencil size 4 petals cut out and glue.
 With the second template size 5 petals cut and dry for the inner shaping each petal in a teaspoon can. When sticking to the bud with the first petal start - if the leaves are long, slightly cut with nail scissors.
 This is what the bud from now ...
Now with the 3rd Cookie cutter or stencil size 6 petals and make in tablespoons leave. (I have come here with the sizes a little confused, why do not all the petals from the same ...)

 So the thinned and shaped petals look the way out from behind ....
The 6 petals, starting with the first-made, overlapping glue on the bud. The bud then hang upside down until the next layer is glued petals.

 Such is the bud of a short dry season, before the next layer is bonded.
For the next round 7 petals with the 3rd Size , cut out each set immediately after thinning and shaping in a tablespoon of dried, and then - stick overlap - again starting with the first. This works best if you keep the flower upside down and aufklebt the petals from below.

 In the Apple board to make a hole and let the flower dry overnight in it. Thus opening the flower something :-) fall apart without too much
Get out in the 2nd Part of the instructions, which I will publish in a week or so ...
But even now sees the flowering of great, right?
Here is a dafoldil
Color the gum paste with yellow gel paste. You can make the flower all yellow or you can make the petals white and the cup in the center yellow.
To make the outside petals, roll out the gum paste very thinly and cut with a daffodil cutter. Dust the work surface with a bit of cornstarch to avoid sticking. You can cut them one at a time as you go or cut a few at a time and keep the other ones under
-daffoil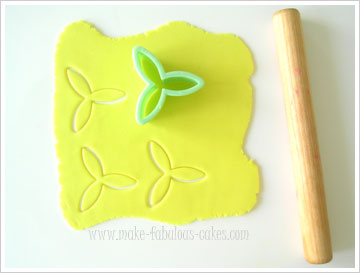
Transfer the petal to a soft piece of foam. Thin the edges with the ball tool.
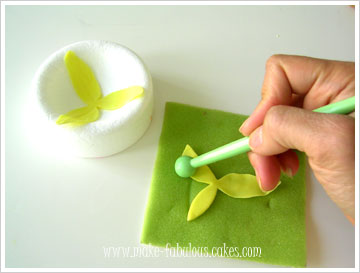
Take the foam with the cut petal and press to a flower veiner. Mark a vein in the middle of the petals with the gum paste veiner pad
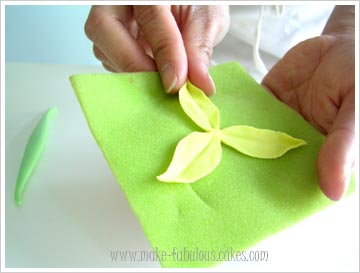
Carefully, place on a flower former with the help of a small metal spatula. Make another petal. Apply a bit of gum glue on the middle of the first petal and place the second petal on top. Secure in place by pressing lightly with a gum paste ball tool -
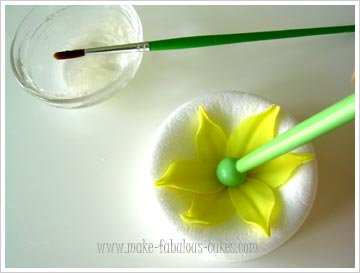
To make the cup in the center, take a piece of gum paste about the size of 3/4" ball -
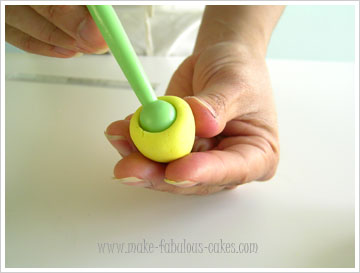
Make a cone shape from the gum paste ball. Make a cup by slowly rotating the ball tool in the middle of the cone until it is halfway inside -
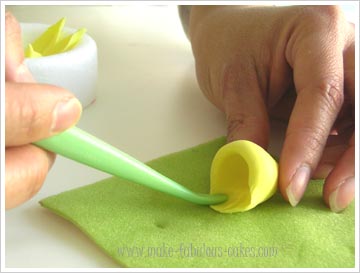
Place the cone on the foam and pull out the edges with the veining tool. Do this all the way around the cup -
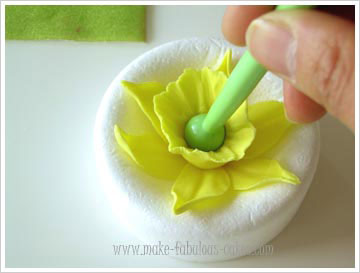
Brush some gum glue in the middle of the petal and press the cup in the middle with the help of a ball tool -
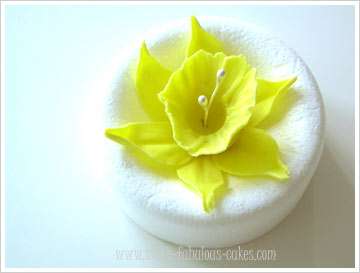
Fold the flower stamen, dip folded end in the gum glue and insert in the middle of the cup. Let the finished gum paste daffodil dry in the flower former at least for a day

No comments:
Post a Comment